This is the third in a series describing the role of the Royal Canadian Engineers during the Battle of the Scheldt. Operation VITALITY lasted from 22 until 30 October 1944. A review of the four main tasks of the Battle of the Scheldt is in order. The first task was for the 2nd Canadian Infantry Division to drive north from Antwerp and cut off the South Beveland peninsula. This task had no operational name attached but was a significant effort a full two weeks to complete. The second task, Operation SWITCHBACK in which the 3rd Canadian Infantry Division would assault the Leopold Canal and clear the Breskens Pocket.
|
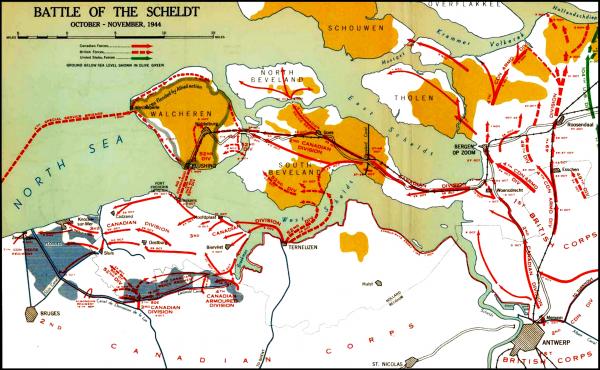
Concurrent to these operations, the 4th Canadian Armoured Division first assisted in the 3rd Division in the Breskens Pocket and then moved northeast of Antwerp to drive north towards Bergen op Zoom and secure the right flank of I Canadian Corps. At the time the 2nd Division launched Operation VITALITY to take South Beveland, the 3rd Division was still well into clearing the Breskens Pocket and the 4th Armoured Division had secured most of their eastern flank. The fourth task would be Operation INFATUATE, the capture of Walcheren Island.
4th Canadian Armoured Division - Securing the Flank
The 4th Canadian Armoured Division, including their engineers, started to move out of the 3rd Division area on 15 October to take their place on the right flank of the 2nd Division north of Antwerp. The first sapper task for the 8th Field Squadron to put another 80-foot DS Bailey bridge over the Antwerp-Turnout Canal so that the rest of the 4th Armoured Division could move to their forming up places south of Marie del Heide. The engineers had under command 81 Assault Squadron, RE with their AVREs.

Early on 20th October the 4th Armoured Division, organised into two battle groups, launched their advance in the direction of Bergen op Zoom as shown on the map. There was stiff resistance all the way and it took a full seven days of fighting to capture Bergen op Zoom and secure the flank for the 2nd Division. The area was heavily mined and studded with roadblocks of all descriptions. The sappers were at the front of the advance, the 8th Field Squadron on the west and 9th Field Squadron the on the east.
8th Field Squadron Tasks
The 8th Field Squadron probably had one of the most difficult sapper tasks of the war. On 19 October, 3 Troop swept about a mile of road in preparation for the advance. The next day, the 2 Troop Recce officer, Lt Ditchburn with a section, took the lead. Lt McAdam brought the rest of the troop closely behind in their half-tracks. The first obstacle was a crater over 30 feet wide and completely blocking the road. Then there were eight abatis averaging 200’ in length with 20 trees in each one. There were booby traps on every third tree, some shells, some Tellermines, all wired from branch to branch. On this same stretch, three craters, two anti-tank ditches and two mine and wire roadblocks were cleared. All this was completed under sporadic artillery and mortar fire and aimed machine-gun and cannon fire.

built by the 8th Fd Sqn
The work got harder as they advanced. Block after block of trees, a canal and three anti-tank ditches, all with cleverly concealed booby-traps, slowed the move forward. Sappers were killed and wounded and equipment was damaged and destroyed. At one obstacle protecting a railway crossing, a booby-trapped 50 Kg bomb killed three and seriously wounded two others. On the other side of the crater, the next 150 yards had a solid abatis thickly booby-trapped. Two German snipers hiding nearby were wounded when a charge went off. Cpl Buchanan went forward to recce the north end of the block and stepped on a Schumine and lost his foot. Lt Ward and Spr Fulham rushed to his aid and Lt Ward stepped on another mine, losing a leg. Spr Fulham caught the blast fully in the face. As the wounded were being carried out, Spr Johnston stepped on another mine and was fatally wounded.
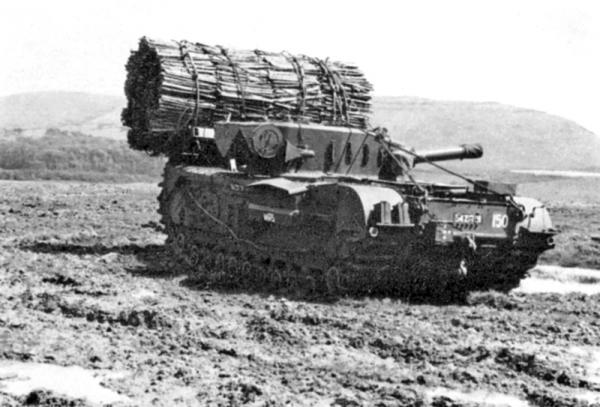
The abatis was removed, a large flooded crater filled, a gap over a canal was filled with fascines carried by the AVREs, and a large unexploded bomb (UXB) was dragged behind a winch truck out of the road and into a field. The sappers of the 8th Field Squadron finally reached the town of Esschen (Essen in French) from the west on 23 October after one of the most harrowing experiences of their careers. As they arrived, two vehicles then blew up on mines and caused three more sapper casualties and bringing the total beyond those incurred in the preceding two months.
9th Field Squadron Tasks

to fill ditches
The sappers advancing on the eastern axis were more fortunate in terms of having fewer casualties, but the work was no less challenging and dangerous. From the start line, 1 and 2 Troops lifted mines, booby-trapped bombs and burned-out vehicles from roadways and gates. Following on, 3 Troop cleared side roads removing mines, bombs and other obstacles and AVREs filled blown out culverts with fascines. 2 Troop lost two sappers killed and four wounded from ‘S’ mines while opening a lateral route. There were continuous belts of anti-personnel and anti-tank mines across the axis that had to be breached in several places. Along the way, a dispatch rider and another sapper from squadron HQ ran into an enemy party who were likely looking for an excuse to surrender, captured 43 Germans after killing three.
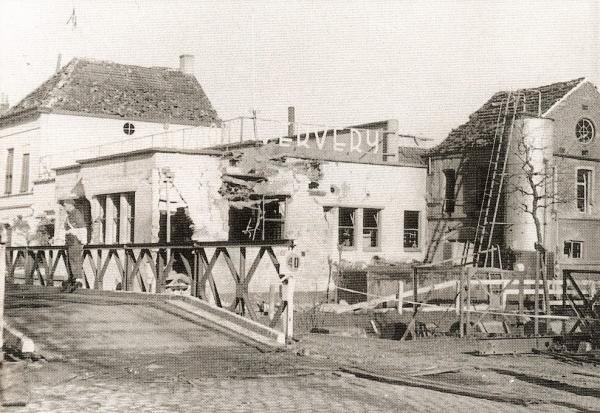
As the Division approached the town of Esschen on 21 October, a plan was made for the infantry to infiltrate the enemy lines in the darkness and fog and occupy the town during the night. 1 Troop was to bridge the Roosendale Canal so that supporting armour could cross at first light. There was no time for a proper recce and the assigned troop found the road so narrow that Bailey stores had to be offloaded with the trucks facing the gap. The AVREs stood by just in case, but despite working in total darkness, the 40-foot DS bridge was in place by 0630 hours the next morning. The first tank across was a flail followed by a tank squadron. Later, when the Bailey bridge was replaced, sappers found a booby-trapped bazooka and four British 3.7-inch anti-aircraft shells under the footings.
After a hard fight, Esschen was captured on the morning of 22 October 1944.
The Drive to Bergen op Zoom
The next day, the 4th Division moved on, west and northwest from Esschen towards Bergen op Zoom. The sappers moved fast clearing the way of obstacles. One section of sappers cleared a steel knife rest from a road junction that was not captured by the infantry until the following day. On 26 October, the 9th Field Squadron built an 80-foot DS Bailey over the Zoom Canal with 88mm shells whizzing overhead. At this point, the forces split with one driving towards Wouw supported by the 8th Field Squadron and the other one straight for Bergen op Zoom with the 9th Field Squadron in support. On the west route, the 8th Field Squadron had to deal with little more than a sand track through a wooded area that was heavily mined and booby-trapped. Several tanks and other vehicles were blown up as they advanced. The squadron made good use of its AVREs despite the soft ground.
On the east route, progress was faster but no easier. Despite being under continuous machine-gun fire and taking several casualties, the 9th Field Squadron completed clearing the eastern route into the town. Spr Leo Schan managed to build up the causeway with his armoured dozer. He was wounded but finished the task and saw the tanks across before he handed over to his relief operator and hobbled to the rear, herding a batch of German prisoners for good measure. His determination won himself a Military Medal. The town was outflanked and fell to the Canadians on the evening of 27 October and the right flank of the 2nd Division secured for Operation VITALITY.
2nd Infantry Division - Taking South Beveland
Clearing the Beveland Isthmus
Operation VITALITY was planned as a combined operation. The plan for the initial phase was for the 2nd Canadian Division to drive forward rapidly across the Beveland Isthmus and seize crossing over the Beveland Canal. Once that was complete, the 52nd (Lowland) Division would launch an amphibious attack from the area east of Terneuzen into South Beveland.
Operation VITALITY had roared into life with a half-hour barrage at 0400 hours, 24 October when the 2nd Division attacked in two columns, 4th Brigade right – 5th Brigade left, avoiding strong points and aiming to secure crossings of the Beveland Canal some 15 Kilometers ahead.
While the defences in the neck of the isthmus fell quickly, it was soon discovered that the only feasible route across the Isthmus was along the road and railroad on the north side. The infantry of the 4th Brigade, with the 2nd Field Company in support, assumed the most responsibility.
The enemy had prepared all the usual obstacles. A particularly nasty mine-and-wire barrier, covered by fire, stopped the infantry north-east of Rilland on the night 24 – 25 and two attacks failed to get through. There was no way around. Lance-Sergeant P. J. Jessome then led a small sapper party forward and, by keeping well down, it managed to clear away much of the wire while machine-gun fire crackled overhead. He checked the road 100 yards beyond the barrier for mines, before declaring the route safe, and got back unharmed to be, in due course, awarded the Distinguished Conduct Medal. With constant fighting, the slow advance continued. Early on 26 October, the 6th Brigade replaced the exhausted 4th Brigade for the final drive to the Canal.
Assault from the West
Concurrent to the 2nd Division assault across the Beveland Canal, work was being carried out on the south bank of the Scheldt to prepare for the British 52nd (Lowland) Division’s assault crossing of the estuary. The British division, under command II Canadian Corps, had no divisional engineers. Their sapper support would come from II Corps Troops Engineers field companies: the 29th, 30th and 31st Field Companies with the 8th Field Park Company.
Before launching the assault, the 30th Field Company had erected another five artillery observation towers, 80 feet in height, and guns had been registered on Beveland targets. The 31st Field Company had been developing a harbour for the amphibious vehicles and had assembled large quantities of ramp-construction materials and bulldozers, behind the dikes on the home side. The 29th Field Company was tasked to cut the Beveland dikes and open far-shore exits and had loaded all their engineer stores into the amphibian vehicles at Terneuzen. Finally, sappers from the 30th Field Company readied the stormboats from which they were to lay smoke, to conceal south-shore activities for the next several days.

across the Scheldt - Op VITALITY
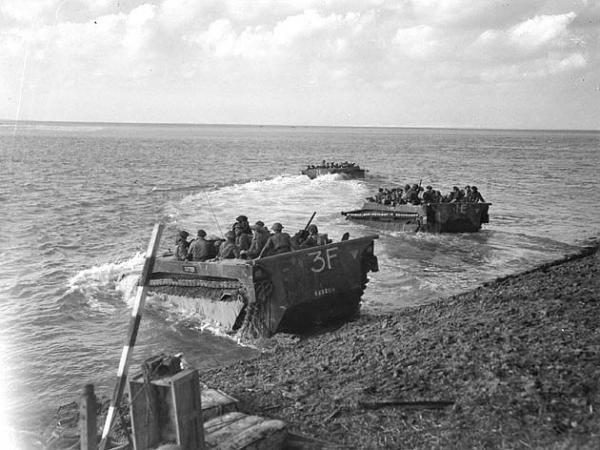
In the early darkness of 26 October, the 52nd Division embarked in their Buffalo and Terrapin amphibious vehicles for the far bank, some eight kilometres away. With them were two platoons from the 29th Field Company with Major H.E. Dickson, their officer commanding, to prepare and maintain exits. They took with them, Lt David Veitch from the 31st Field Company whose task it would be to recce Class 40 raft landing sites on the far bank.
The fleet was at sea when at 0430 hours a heavy barrage fell on enemy targets. This blotted out the noise made by the 31st Field Company dozers on the south bank building exit ramps and a causeway so that returning Terrapins and Buffalos could return to the home bank for more men and supplies. The Germans returned artillery fire and at 0445 hours a Buffalo LVT (Landing Vehicle Tracked) was hit and destroyed covering the sea about with flaming fuel and oil. Cpl Finn Johansen spotted a survivor and disregarding the fire, dove into the water without removing his kit to make a successful rescue. He later received the Military Medal.
The sappers landed before 0500 hours. Number 1 Platoon landed on Amber Beach and blew out the top of the rip-rapped dike. Number 3 Platoon landed on Green Beach and found it needed no immediate work. The LVTs started off-loading men and stores and the infantry moved rapidly inland, outflanking the Beveland Canal defences. The sappers on Amber saw little of the Beveland. For the rest of the month, they lived in holes in the dike and maintained the dike-crossings and beach-tracks, and manhandled engineer stores ashore. Around the corner on Green beach, the story was different. The site came under fire from the start. Three men were killed and eight wounded. Continued fire made Green beach useless and it after 1040 hours, it was closed. The sappers were evacuated at 1500 hours and the beach was abandoned.
Once the Scots were firmly established, stores started flowing across the Scheldt using rafts and LVTs. The 27th Field Company constructed four Class 9 rafts. Crossing the wide strait in the wind and mist, avoiding sunken obstacles and contenting with tides and currents made true sailors out of the sappers navigating with their compasses. The 31st Field Company launched 60-foot Class 40 Bailey raft on the 28th and set offloaded with a D-7 dozer and 10 tons of Sommerfeld track on what would be the longest Bailey sea-voyage on record — an estimated 12 kilometres before touch down. The water was rough and water flowed into the pontoon hatches faster than the pumps could pump it out. The engines laboured against the wind and the raft made only 1 kph across the Scheldt. The enemy fired on the raft but fortunately, their aim was poor. A navy tug boat helped get the raft to shore, but not before the Sommerfeld track had to be jettisoned. After 4 on a half hours, the D-7 landed on the beach, In the end, with the aid of a naval tow, the unwieldy contraption reached the bridgehead and discharged the D-7. The trip had taken four and one-half hours.
Luckily smaller Class 9 rafts performed better. By the 29th, they had ferried over 100 vehicles across. The work was hard and on the 30th, the 20th Field Company drew a hefty rum ration. Their War Diary note of that day reads:
“Rum ration issued to pls. It was divided up and put into jerricans and sent out to them. It was later discovered that there was kerosene in one of the cans. No. 2 Pl were the unlucky ones who got the Rum-Kerosene mix. They are now asking for another kerosene ration . . .”
On 31 October, the 29th Field Company took over the rafts and the 20th Field Company returned to Army Troops.
Crossing the Beveland Canal
Meanwhile, on the Beveland Isthmus, the 6th Brigade's attack towards the Beveland Canal went well and by the morning of the 27 October, all three battalions had reached the waterway’s edge. As expected, the Germans destroyed all the bridges and there was a large crater in the main road to the dike. A 60-foot Class 40 Bailey was open build over the crater and other craters filled by dozers. The route to the canal was opened by mid-afternoon. Before midnight, the centre battalion (The South Saskatchewan Regiment) used assault boats and had secured a small bridgehead. The 11th Field Company with two platoons of the 2nd Field Company under command started bridging the canal.
The 2nd Field Company was assigned a floating bridge (Folding Bridge Equipment - FBE) about 220 metres south of the demolished main highway bridge. Work began at midnight with an armoured dozer cutting through the dike and levelling the approaches. After an hour, the Germans had ranged in on the site and work stopped for the next 30 minutes. There was a gap of an hour when the work continued before renewed shelling wounded three sappers. After another 30 minutes, another hour’s work was completed before the enemy’s third "stonk" brought five more casualties, one fatal. The Allies were finally able to lay some anti-battery fire down on the enemy and the work continued with help from the 11th Field Company later that morning. Twice more shelling interrupted the work but the 340-foot bridge opened at 1500 hours on the 28 October. The bridge commander, Lieutenant Alfred Street was awarded a Military Cross for his efforts leading the construction. Sergeant Norman Loiselle and Lance-Sergeant Bertram West, respectively in charge of the near and far bank construction sites, each received a Military Medal. Before the day was out, the 7th Field Company had a Class 40 raft carrying armour into the bridgehead. A Class 40 Bailey bridge was completed before first light on 30 October. The enemy, now outflanked by the 52nd Division and facing the determined efforts of the Canadians, had no choice but to flee to Walcheren Island. South Beveland was secure.
Next: The Role of the RCE in Operation INFATUATE
Article compiled by LCol Don Chipman (Ret'd) from official histories, war diaries and open sources.